
React Native Firebase Chat Demo
React Native is one of the most productive ways to build a cross-platform mobile app, especially for developers with a background in JavaScript. It has provides excellent support for Firebase with the React Native Firebase package
In the following lesson, we will build a basic chat app with React Native and Firebase. It allows a user to sign in with Google and then access a group chat room. The user can read a realtime feed of recent chat messages via Firestore and post new messages into the chat. The goal is to demonstrate essential patterns when working connecting Firebase users to their data in a React Native app.
Setup
Create a React Native App
Create an app with the React Native CLI
Install Firebase
Follow the official Firebase setup instructions. This tutorial targets Android as the primary platform.
Make sure to enable Google Authentication on the Firebase console and follow the instructions to obtain an SHA1 key.
Add the following packages as dependencies:
{
    "dependencies": {
    "@react-native-firebase/app": "^12.8.0",
    "@react-native-firebase/auth": "^12.8.0",
    "@react-native-firebase/firestore": "^12.8.0",
    "@react-native-google-signin/google-signin": "^7.0.0-alpha.3",
    "react": "17.0.2",
    "react-native": "0.65.1",
    "react-native-vector-icons": "^8.1.0"
  }
}
Data Model
Firestore consists of a single collection chats where each document contains the following data:
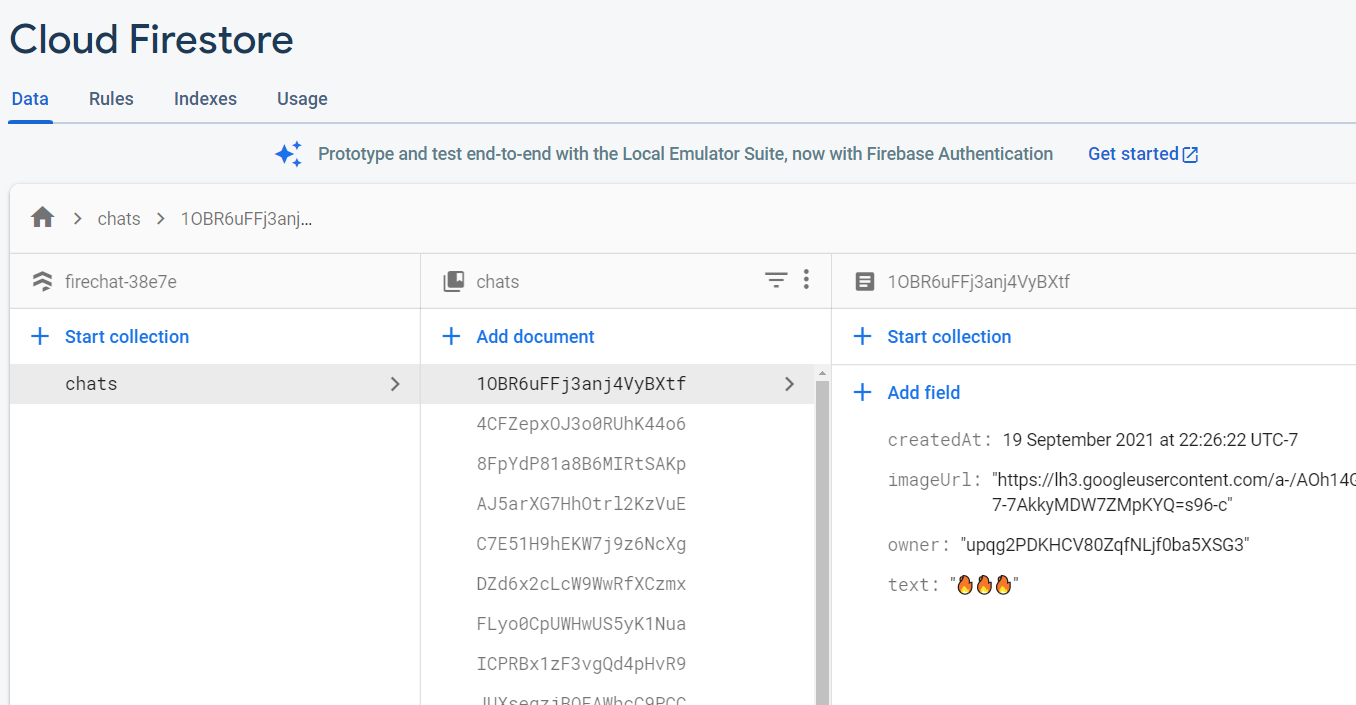
Firestore data model for chat app
User Authentication
Authentication State
We can listen to the user’s authentication state in realtime and react to changes. If signed in, the app will show the chat feed, but if signed out it shows the Sign In with Google button.
import React, {useEffect, useState} from 'react';
import {SafeAreaView, StatusBar, View, StyleSheet} from 'react-native';
import ChatScreen from './screens/chatScreen';
import auth from '@react-native-firebase/auth';
import LoginScreen from './screens/loginScreen';

const App = () => {
  const [user, setUser] = useState(null);

  useEffect(() => {
    // Auth listener
    const unsubscribe = auth().onAuthStateChanged(user => {
      user ? setUser(user) : setUser(null);
    });
    return () => {
      unsubscribe();
    };
  }, []);

  return (
    <SafeAreaView style={styles.backgroundStyle}>
      <StatusBar barStyle={'dark-content'} />
      <View style={styles.viewStyle}>
        {user ? <ChatScreen /> : <LoginScreen />}
      </View>
    </SafeAreaView>
  );
};
Sign In with Google
In order to sign in with Google, we must first use the “Google Sign In” package to bring up a native widget where the user can access their Google account. This will result in an idToken that must be passed off to Firebase to authenticate with the Firebase SDK.
The authentication UI consists of a button that comes prepackaged from the Google Sign In package.
import React from 'react';
import auth from '@react-native-firebase/auth';
import {
  GoogleSigninButton,
  GoogleSignin,
} from '@react-native-google-signin/google-signin';
import {View, StyleSheet} from 'react-native';

const LoginScreen = () => {

  // Initialize google sign in
  GoogleSignin.configure({

    // Pulled from Google Authentication settings in Firebase console
    webClientId: 'YOUR_CLIENT_ID.apps.googleusercontent.com',
  });

  const handleLogin = async () => {
    try {
      const {idToken} = await GoogleSignin.signIn();
      const googleCredential = auth.GoogleAuthProvider.credential(idToken);

      return auth().signInWithCredential(googleCredential);
    } catch (error) {
      console.log(error);
    }
  };

  return (
    <View style={styles.container}>
      <GoogleSigninButton
        style={styles.googleButton}
        size={GoogleSigninButton.Size.Wide}
        color={GoogleSigninButton.Color.Dark}
        onPress={handleLogin}
      />
    </View>
  );
};
Chat Messages
Chat Feed
The chat messages are first retrieved from Firestore in the useEffect hook when the component is first mounted. When the query’s data changes, it will be updated with the useState hook to re-render the UI. The list of messages are passed to React Native’s FlatList to provide a scrolling vertical collection of items. We can also compare the owner field on the document of the current logged in user.
const ChatScreen = () => {                    // Input text
  const [chats, setChats] = useState([]);                    // Chat messages
  const [loading, setLoading] = useState(true);              // Loading state


  useEffect(() => {
    const unsubscribe = firestore()
      .collection('chats')
      .orderBy('createdAt', 'asc')    // Sort by timestamp
      .limitToLast(15)                // Only retrieve the last 15 messages
      .onSnapshot(querySnapshot => {
        const chatsArr = [];
        querySnapshot.forEach(doc => {
          const id = doc.id;
          const data = doc.data();
          // Add docId and chat data to chats array
          chatsArr.push({id, ...data});
        });
        setChats(chatsArr);
        setLoading(false);
      });

    return () => {
      unsubscribe();
      setLoading(false);
    };
  }, []);

  if (loading) {
    return <ActivityIndicator />;  // Show loader while loading chats
  } else {
    const username = auth().currentUser.displayName;

    return (
      <View style={styles.container}>
        // Top app bar
        <View style={styles.textContainer}>
          <Text style={styles.text}>{username}</Text>
          <SignOutButton handleClick={handleSignOut} />
        </View>

        // Chats container
        <View style={styles.chatStyle}>
          {chats && (
            <FlatList
              data={chats}
              renderItem={({item}) => <Chat key={item.id} chat={item} />}
            />
          )}
        </View>
      </View>
    );
  }
Send a Message
The final step is to provide a form input where the user can send a new message in the chat and write it to Firestore. React Native provides a TextInput that can react to changes typed into a text field. We pass the value from the input to the sendMessage function that performs a write in Firestore.
const ChatScreen = () => {
  const [text, setText] = useState('');                      // Input text
  const timestamp = firestore.FieldValue.serverTimestamp();  // Firestore timestamp

  const sendMessage = async e => {
    const {uid, photoURL} = auth().currentUser;

    // Dont allow empty/large messages
    if (text.length > 1 && text.length < 40) {
      try {
        e.preventDefault();
        setLoading(true);

        await firestore()
          .collection('chats')
          .doc()
          .set({
            owner: uid,
            imageUrl: photoURL,
            text: text,
            createdAt: timestamp,
          })
          .then(() => {
            setText('');
            setLoading(false);
          })
          .catch(err => {
            setLoading(false);
            Alert.alert('Error', err);
          });
      } catch (err) {
        setLoading(false);
        Alert.alert('Error', err);
      }
    } else {
      setLoading(false);
      Alert.alert('Chat not sent', 'Must be between 1 and 40 characters');
    }
  };


  if (loading) {
    return <ActivityIndicator />;  // Show loader while loading chats
  } else {
    const username = auth().currentUser.displayName;

    return (
      <View style={styles.container}>

        // Bottom input bar
        <View style={styles.inputContainer}>
          <Input text={text} setText={setText} />
          <SendButton handleChat={sendMessage} />
        </View>
      </View>
    );
  }
};
That’s it. We now how a basic chat app built with React Native and Firebase. If you’re exploring mobile app solutions, also check out the sister tutorial Flutter Firebase Chat App.