Material Data Tables With Firestore
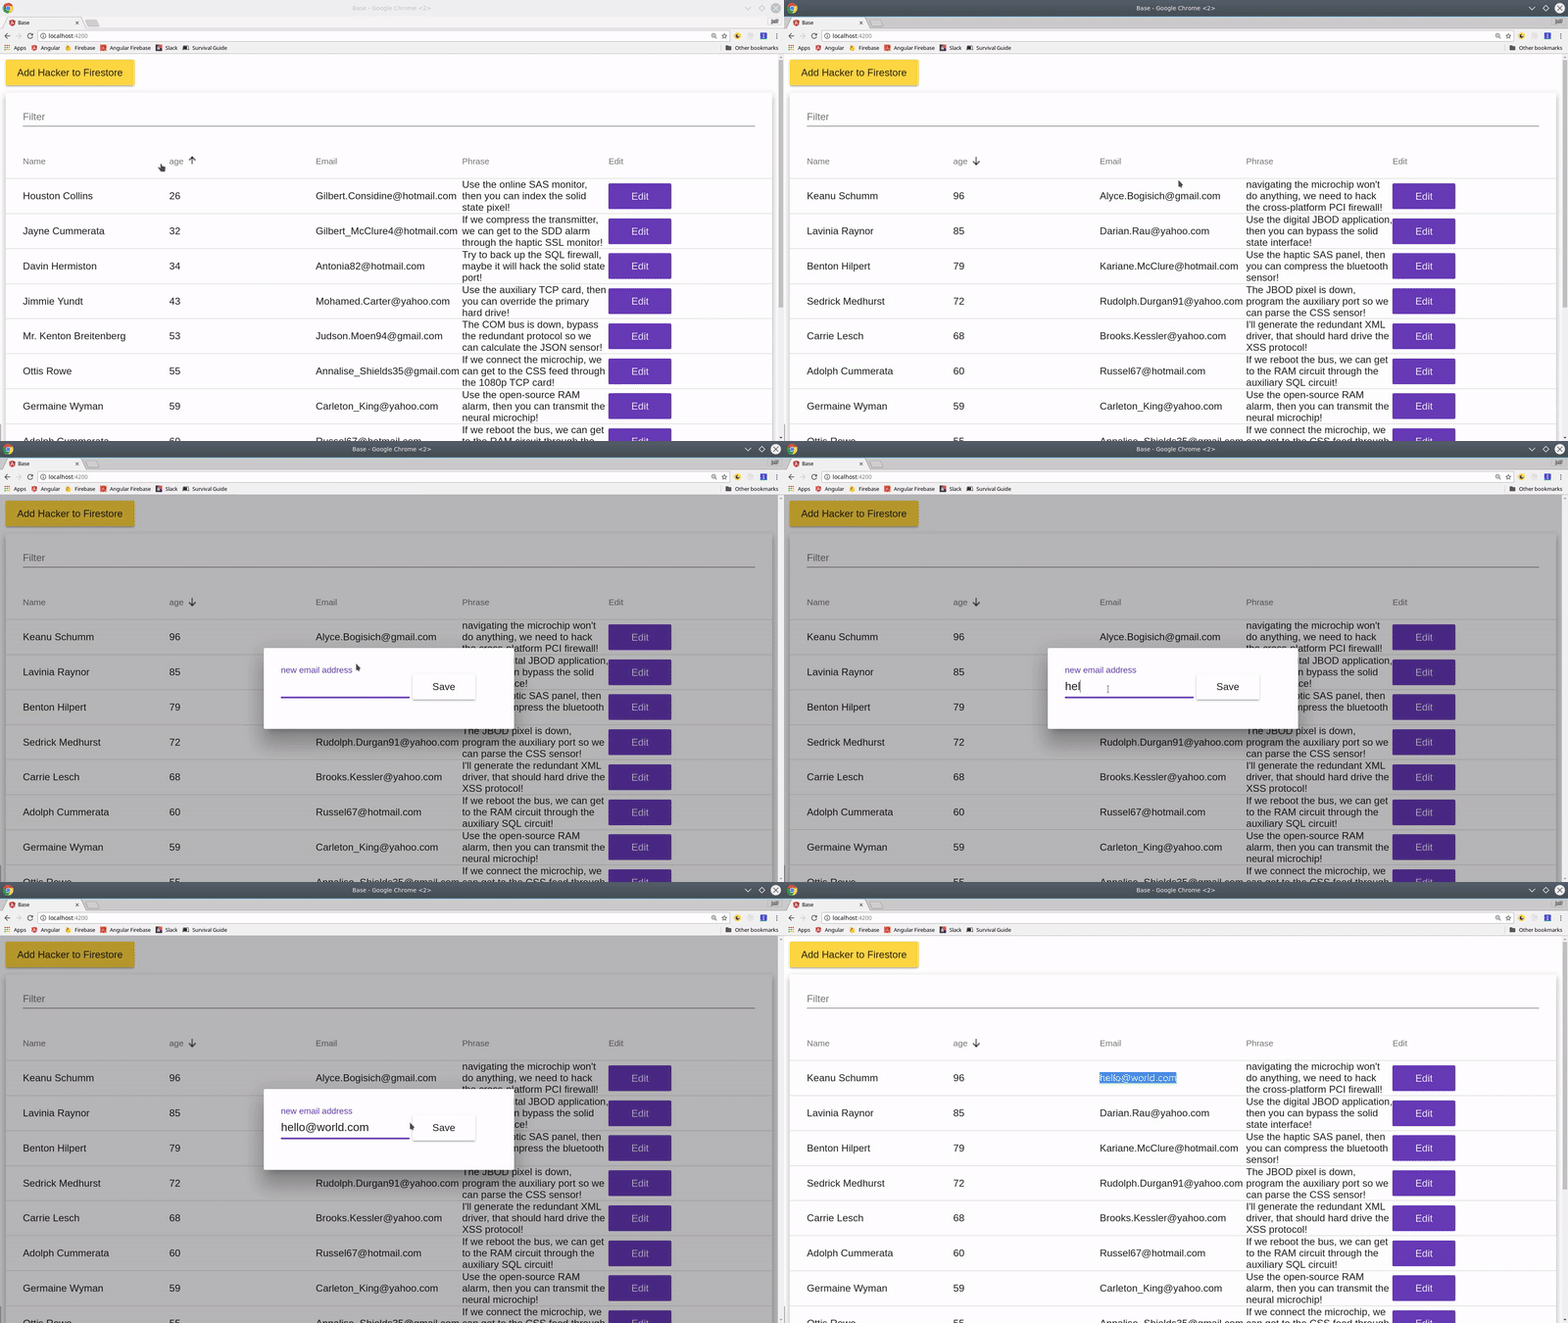
In this lesson, I will show you how to build an Angular Material data datable that is sortable and filterable, while maintaining a realtime connection with Firestore. A dialog modal will be used share data between material components and update documents in Firestore.
This tutorial also makes suggestions for performance optimization when dealing with hundreds rows in the view. The end result is a table that…
- Uses Firebase/Firestore as the data source.
- Filterable
- Sortable
- Performance optimized

Demo of datatable with Angular material and Firestore
Initial Setup
Angular Material is a modular project, so we need to import the modules needed for our realtime data table. In addition, it requires the Forms, Animations, and AngularFire modules.
App Module
Here is a full breakdown of the configuration for this project.
Notice entryComponents: [EditDialogComponent] - this part is needed because the dialog is not loaded by the router, nor is it declared in the HTML.
// app.module.ts

// ... default imports omitted

import { AngularFireModule } from 'angularfire2';
import { AngularFirestoreModule } from 'angularfire2/firestore';

import { BrowserAnimationsModule } from '@angular/platform-browser/animations';
import { FormsModule } from '@angular/forms'

import {
  MatTableModule,
  MatFormFieldModule,
  MatInputModule,
  MatSortModule,
  MatDialogModule,
  MatButtonModule
} from '@angular/material';

import { EditDialogComponent } from './edit-dialog/edit-dialog.component';
import { DataTableComponent } from './data-table/data-table.component';

@NgModule({
  declarations: [
    AppComponent,
    EditDialogComponent,
    DataTableComponent
  ],
  imports: [
    BrowserModule,
    AppRoutingModule,
    BrowserAnimationsModule,
    FormsModule,
    MatTableModule,
    MatFormFieldModule,
    MatInputModule,
    MatSortModule,
    MatDialogModule,
    MatButtonModule,
    AngularFireModule.initializeApp(firebaseConfig),
    AngularFirestoreModule
  ],
  providers: [],
  bootstrap: [AppComponent],
  entryComponents: [EditDialogComponent]
})
export class AppModule { }
Seeding the Database with Faker
Faker is a handle little tool when you need to seed the database with dummy data.
Installation
npm install faker --save
npm install @types/faker --save-dev
Usage in a Component or Service
Inside a component or service, you can use faker to generate random data and save it in Firestore. In this example, I am generating some basic user data in the hackers collection.
Only use Faker for testing and development - it is not a library you would normally include in a production app.
import * as faker from 'faker';

// ...omitted

  addOne() {
    const hacker = {
      name: faker.name.findName(),
      age: faker.random.number({ min: 18, max: 99 }),
      email: faker.internet.email(),
      phrase: faker.hacker.phrase(),
      uid: faker.random.alphaNumeric(16)
    }
    this.afs.collection('hackers').doc(hacker.uid).set(hacker)
  }
Data Table Component
Our datatable will have the following characteristics.
- Realtime connection to Firestore
- Filterable
- Sortable
- Performance Optimized with TrackBy
Keep in mind, all this filtering is happening client-side, so make sure to limit your Firestore queries if working with a large dataset.
ng g component data-table
data-table.component.ts
The trackByUid method is optional, but it will prevent the view from re-rendering every row when data changes. If you have a very large data table, trackBy can provide a significant boost in rendering performance.
import { Component, AfterViewInit, ViewChild } from '@angular/core';

import { AngularFirestore } from 'angularfire2/firestore';

import { MatTableDataSource, MatSort, MatDialog } from '@angular/material';
import { EditDialogComponent } from '../edit-dialog/edit-dialog.component';


@Component({
  selector: 'data-table',
  templateUrl: './data-table.component.html',
  styleUrls: ['./data-table.component.sass']
})
export class DataTableComponent implements AfterViewInit {

  displayedColumns = ['name', 'age', 'email', 'phrase', 'edit'];
  dataSource: MatTableDataSource<any>;

  @ViewChild(MatSort) sort: MatSort;

  constructor(private afs: AngularFirestore, public dialog: MatDialog) { }


  ngAfterViewInit() {
    this.afs.collection<any>('hackers').valueChanges().subscribe(data => {
      this.dataSource = new MatTableDataSource(data);
      this.dataSource.sort = this.sort;
    })
  }

  applyFilter(filterValue: string) {
    filterValue = filterValue.trim();
    filterValue = filterValue.toLowerCase();
    this.dataSource.filter = filterValue;
  }

  openDialog(data): void {
    const dialogRef = this.dialog.open(EditDialogComponent, {
      width: '350px',
      data: data
    });
  }

  trackByUid(index, item) {
    return item.uid
  }

}
data-table.component.html
Most of this code is directly from the Material documentation. The mat-table is very similar to *ngFor - it just loops over each object in the data source and displays a row.
<div class="example-header">
  <mat-form-field>
    <input matInput (keyup)="applyFilter($event.target.value)" placeholder="Filter">
  </mat-form-field>
</div>

  <mat-table #table [dataSource]="dataSource" [trackBy]="trackByUid" matSort class="animate">

    <ng-container matColumnDef="name">
      <mat-header-cell *matHeaderCellDef mat-sort-header> Name </mat-header-cell>
      <mat-cell *matCellDef="let hacker"> {{ hacker.name }} </mat-cell>
    </ng-container>


    <ng-container matColumnDef="age">
      <mat-header-cell *matHeaderCellDef mat-sort-header> age </mat-header-cell>
      <mat-cell *matCellDef="let hacker"> {{ hacker.age }} </mat-cell>
    </ng-container>


    <ng-container matColumnDef="email">
      <mat-header-cell *matHeaderCellDef mat-sort-header> Email </mat-header-cell>
      <mat-cell *matCellDef="let hacker"> {{ hacker.email }} </mat-cell>
    </ng-container>


    <ng-container matColumnDef="phrase">
      <mat-header-cell *matHeaderCellDef mat-sort-header> Phrase </mat-header-cell>
      <mat-cell *matCellDef="let hacker"> {{ hacker.phrase }} </mat-cell>
    </ng-container>

    <ng-container matColumnDef="edit">
        <mat-header-cell *matHeaderCellDef mat-sort-header> Edit </mat-header-cell>
        <mat-cell *matCellDef="let hacker">
          <button mat-raised-button  color="primary" (click)="openDialog(hacker)">Edit</button>
        </mat-cell>
    </ng-container>

  <mat-header-row *matHeaderRowDef="displayedColumns"></mat-header-row>
  <mat-row *matRowDef="let row; columns: displayedColumns;" class="animate"></mat-row>
</mat-table>
Edit Dialog Component
Dialogs are a convenient UI element for updating information in a data table. The main question is How do we pass data from AngularFire to the Material Dialog?.
edit-dialog.component.ts
Material has a built-in mechanism for passing data from parent to child. You inject the data as a dependency by adding @Inject(MAT_DIALOG_DATA) to the constructor.
import { Component, Inject } from '@angular/core';
import { MatDialog, MatDialogRef, MAT_DIALOG_DATA } from '@angular/material';
import { AngularFirestore } from 'angularfire2/firestore';

@Component({
  selector: 'edit-dialog',
  templateUrl: './edit-dialog.component.html',
  styleUrls: ['./edit-dialog.component.sass']
})
export class EditDialogComponent {

  newEmail: string;

  constructor(
    private afs: AngularFirestore,
    public dialogRef: MatDialogRef<EditDialogComponent>,
    @Inject(MAT_DIALOG_DATA) public data: any) { }

  onNoClick(): void {
    this.dialogRef.close();
  }

  updateEmail(): void {
    this.afs.collection('hackers').doc(this.data.uid).update({ email: this.newEmail })
    this.dialogRef.close();
  }
}
edit-dialog.component.html
The html is just a form input that binds the value with ngModel.
<mat-form-field>
  <input matInput [(ngModel)]="newEmail" placeholder="new email address">
</mat-form-field>

<button mat-raised-button (click)="updateEmail()">Save</button>
The End
You now have a realtime data table that can easily be customized with your own firestore data. Let me know what you want to see next.
